
|
Back to |
| The Front Page |
| The Game |
|
USCA Croquet Playbook: How to make leaves
|
|
|
Lots of players can run breaks. Not so many know how to make a good leave at the end of a break. For this you need three things: control of the break, control of the spent ball, and a plan. The first two are mainly a matter of practice. This article deals with that last item: planning and executing leaves in American rules croquet.Note: The proportions of the illustrations may give a false impression of wiring positions. Please read the text carefully for the exact ball placement for wiring positions
A good leave has two basic requirements: your opponent does not have a short shot, and your partner ball is set up for a three-ball break. There are many ways to improve on the basic leave, the main ones being to lengthen the opponent's shot, to wire the opponent from any ball in the open court, and to leave no free shots. By "short" I mean any shot of less than about 15 yards, and by "free" I mean a shot your opponent can take and miss without giving you an immediate four-ball-break.
The following examples are taken from real games. In some cases the break is ragged and the goal is a basic leave. In other cases there is more scope for refinement. If you can make a three-ball break with reasonable control at least some of the time, you are ready to try all of these leaves. If your play isn't so consistent yet you can still practice them. Practicing detailed routines like these is much more rewarding than aimlessly practicing breaks.
You have a four-ball break with black, while blue is for #3 and has no deadness. [You may make up your own story as to how you got into such a commanding position. If you're feeling heroic, then say you attacked with blue at the start of the game, and have since peeled blue and picked up red from Corner I. If you're feeling lucky, then say your opponent stuffed #2 with red while you were joined up on the boundary, thus giving you an easy four-ball break.] How are you going to leave the balls at the end of this turn?

You should have a rough plan for the leave from the start of the break. First you need to decide how far to take this break. Will you continue all the way through rover, or stop earlier? If you think you have any chance of taking blue all the way around on your next turn, then take black through rover. You may lose a few games by being pegged out, but you should win many more games by scoring 26 points. Another advantage of going through rover is that you can easily make the very strong leave described in Case 2.
What you should almost never do is stop after penult. The rover peel is easy enough that if your opponent gets in you will probably be pegged out anyway. At the same time, you only make your second break more difficult, as illustrated (and broadcast on ESPN) in the 1994 USCA Nationals singles and doubles finals. In both of these games, the side which won the opening took the first break to rover, and then failed the rover peel on the second break. And in both games, the opposing side mounted a comeback to win 26-25.
Stopping after 4-back will deter all but the strongest players from pegging you out, so the best options are to stop then or go to the peg. Decide on your stopping point as soon as you have the break under control, because there are a few simple things you can do now in preparation for making the leave. Stopping after 4-back is particularly well-suited to this example, where blue is clean and for #3, because an effective leave will be quite easy to make.
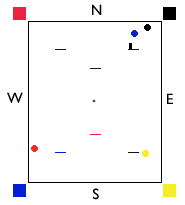
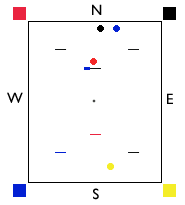
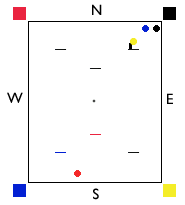
| CASE 1 |
|
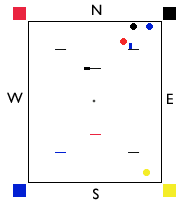
From this ideal end-point look backwards step-by-step. To end the turn with no deadness on black, you need to arrange the other balls in their final positions before running 4-back. You want blue near the boundary, so you should make 4-back off red. Red will then be perfectly positioned as the pioneer for blue's break.
[So here is one element you can plan for early on in black's break - you want to use red as the 4-back pioneer. The best way to ensure this is to make every even-numbered wicket off red. If you make #2 off red, then in the usual course of the break red will be the pioneer at #4, #6, 2-back, and finally at 4-back.
If red is the pivot ball or the pioneer at odd-numbered wickets, you will need to make a swap. Some good opportunities for the swap are after #3 (sending red to #6), after #5 (sending red to 2-back], or after 1-back (sending red directly to 4-back).
To get blue near the north boundary, you can either rush it there and take off to red, or you can play a split shot. The rush is dangerous unless it is a very short one, as you might rush blue off the court. So you plan to use a split shot. To make this shot as easy and safe as possible, you want blue to be quite close to red, allowing you to use a short croquet stroke to send blue toward the boundary. There are two ways to set this up, either by double-loading 4-back or by rushing blue to 4-back after scoring 3-back. I like the latter method because it gives you more control over where to leave yellow, and because it avoids the full-court take-off to 4-back.
So you plan to rush blue upcourt after scoring 3-back. This is also when you need to place yellow in its final position. You accomplish both by double-loading 3-back with blue and yellow. Then after scoring 3-back, roquet yellow first, then croquet it to its final destination. Use that croquet stroke to get an upcourt rush on blue.
[To do the double-loading, after you score 2-back, send red to 4-back, and then rush (or, if necessary, roll) the pivot ball to 3-back. It doesn't matter which ball (blue or yellow) is the pivot and which is the 3-back pioneer.]
Where to leave yellow? Anywhere in the south end of the court will be adequate. Sending it toward Corner I will maximize the length of yellow's shot, and may also make it easier to wire yellow from red at #3, with the peg and #1 acting as additional obstacles to yellow's shot. However, to send yellow there after 3-back requires a big croquet stroke, making it harder to get an accurate upcourt rush on blue. If instead you put yellow a yard or two directly south of 3-back, you can use short, accurate strokes to easily get the rush on blue, while at the same time the 3-back wicket will help you to wire yellow from red. (If yellow happens to be for 3-back, then you can send it toward Corner I.)
Now you have a complete plan for the break and the leave. Early on in black's break, make sure that red is the pioneer at even-numbered wickets, swapping balls if necessary. Continue with a normal four-ball break until after 2-back. Double-load 3-back, placing yellow where you can roquet it first after scoring the wicket. After scoring 3-back roquet yellow, then croquet it just south of 3-back, at the same time getting an upcourt rush on blue. Rush blue to near 4-back, then split it toward the north boundary while black goes to red. Roquet red and split it to a position which is hidden from yellow, then score the wicket. Return to blue on the continuation stroke. (If yellow has an open shot on red, you may want to take the deadness on red to get the wiring right.)
If all goes according to plan you will have made a very good leave, good enough to practically force yellow to play defensively into Corner I. Which is why you should have gone to the peg with black. Now instead of a simple three-ball break for blue, you'll have to dig yellow out of the corner and make yet another leave so that you can finish the game with black.
The other drawback to stopping after 4-back is that the leave just described only works well in this particular case. If blue is for a different wicket or has significant deadness, then stopping early will usually result in a less effective leave.
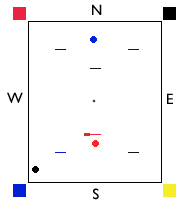
CASE 2: Fifty Ways to Leave Your Rover
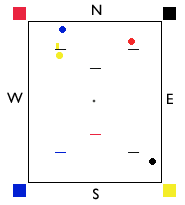
| CASE 2 - THE STANDARD ROVER LEAVE |
|
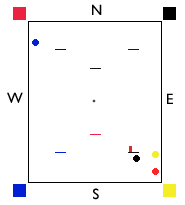
To do this you need black near #4 before you score rover. After scoring rover, rush red to near black, split red toward the boundary, then roquet black, etc. Obviously, you do not want to use black as the rover pioneer.
You want to get a close rush on red after scoring rover, so that you can safely rush it near black. The best way to be sure of getting a particular rush after scoring a wicket is to double-load the wicket. So put both red and blue at rover, with blue positioned so that you can roquet it first after scoring the wicket.
[When positioning blue and red prior to scoring rover, keep in mind that you will be playing a big stop-shot to send blue toward Corner II while getting a rush on red toward #4. Blue should be positioned a foot or two to the west or northwest of rover, with red a couple of yards north. Then after scoring rover, blue is rushed a couple of yards south. Now you are perfectly set to croquet blue into Corner II and get the rush on red.]

The Plan: As soon as yellow's break is under control, make sure that black is not the pioneer at even-numbered wickets, making a swap if necessary. This is an easy way to ensure that black will not be the rover pioneer. Continue with an ordinary four-ball break through penult. After scoring penult, send black to #4 and double-load rover. Score rover, roquet blue, croquet it toward Corner II, while getting a rush on red toward #4. Rush red, then croquet it to a position which is near the boundary and open to blue, while yellow goes to black. Roquet and position black so that it is hidden from blue, then clear through #4 and return to red.
[Resist the temptation to start positioning balls for the leave early in the break. For example, you might be tempted to dump blue in Corner II after you score 1-back. Do not do this (unless, for some strange reason, you intend to stop after 3-back). Keep the four-ball break intact until after penult. This will make your break as easy as possible, and still give you plenty of time to arrange the leave.]
Note that the sequence for making this leave is very similar to that described in Case 1. Also note that this sequence will work no matter what wicket red is for. After penult, send black to red's wicket, then double-load rover with red and blue.
This, then, is a general method you can use whenever your partner ball has no deadness, or is dead only on the ball which it follows in sequence (e.g., red dead only on blue). Run an ordinary four-ball break, making sure that the spent ball will not be the rover pioneer. After penult, send the spent ball to partner's wicket, then double-load rover with the partner ball and the hot ball. Score rover, roquet the hot ball, croquet it to its final position while getting a rush on the partner ball. Rush partner ball near its wicket, then split it toward the boundary. Roquet the spent ball and position it close to the wicket, hidden from the hot ball. Run the wicket and return to partner. Simple, reliable, and very effective.
For the rest of this article, I will refer to this sequence as the "standard rover leave".
CASE 2A: A Thin Line Between Clever and Stupid
If the hot ball is dead on one or two balls, you must leave it an open shot on a ball it is alive on. If the hot ball is only alive on the spent ball, then you can't follow your original plan of hiding the spent ball at your partner ball's wicket. In this case, the ideal leave will differ only in that two of the balls will be transposed. I'll leave it to you to work out a plan. (Hint: the only change you need to make comes at the very end of the sequence.)
Partner (black) is for #3, alive on blue only. Current positions: black is two yards south of 2-back. Yellow is eight yards southwest of 4-back (i.e., near penult). Blue is for 3-back, and has just roqueted red to three yards east of 3-back.
Things are more difficult when your partner ball has significant deadness. Especially since, in this case, you didn't pick up the fourth ball (yellow) until after 2-back. Then you under-hit the big croquet stroke out of Corner I, so you had to shoot fairly hard at your 3-back pioneer. At the moment you need to concentrate on getting the break back into shape. You're going to have enough trouble just getting through 3-back.
In a tournament match many players would automatically take off to 3-back. The take-off may be easier than a split shot, but it's no guarantee that you'll score the wicket. In this case it does guarantee that you won't have a useful rush on red if you do score the wicket. With such a poor pioneer at 4-back, it is worth taking some extra risk with the approach to improve your chances of continuing the break. If you don't buy this argument, stop reading and go practice approaching wickets from three yards to the side.
| CASE 3 |
|
If you have an upcourt rush, then rush red to near penult, allowing you to get a close rush on yellow to 4-back. Score 4-back, send yellow to rover going to penult, score penult, rush (or roll) red toward Corner I, then send black toward Corner III going to rover. Score rover, rush yellow to #4, take off to black and give it a rush to #3. Alternately, if you make 4-back under control, rush yellow to near rover, take off to black and rush it upcourt to double-load penult. Score penult off red, roquet black and send it toward Corner III, getting a rush on red toward rover. From here you can either send red directly toward Corner I, then finish as above, or you can double-load the rover wicket, then send red away after scoring rover. [The latter option will leave blue dead on red and yellow, which in some ways is better than having blue dead on yellow only, because now blue can be cleared of deadness at some point (not necessarily on this turn).]
Or, having just scored 3-back, you may have a rush toward black. The rush may not be a very accurate one, so after making the rush take off to black, trying to get a rush toward penult. If the rush on black is successful, then I will leave it to you to work out the rest of the turn.
And if you get no useful rush on red after 3-back, now what? You could of course roquet red and roll up to penult, hoping to get a rush on yellow to 4-back. But if that fails then you will have no way of setting a break for black's next turn.
I think a better plan is to roquet red, then roll it to the west end of the court, aiming to get a rush on black. If the rush on black succeeds, then you have a good chance of finishing the break and setting an adequate leave for black. If you don't get the rush on black, you can roll to penult, still trying for the rush on yellow to 4-back, which may come off and allow you to finish the break. And if you don't get the rush to 4-back, you have the option of roqueting yellow and sending it to #4, then giving black a rush to #3. Blue will be three-ball dead and for 4-back, but black will be set for a break. [You also have the option of approaching 4-back from eight yards away, but if this fails black has no break.]
CASE 3A:
Starting positions are the same as above, but black is alive on yellow only.
This one is for you to solve. (Hint: a good method would be to get either black or yellow near #3 before you score Rover, then double-load Rover. Remember to end the turn last-dead on an opponent ball!)
Partner (yellow) is three-ball-dead, for #2. Current positions: blue near 3-back, black three yards west of 2-back, red ball-in-hand on yellow in front of 2-back (red's wicket).
You were unable to peel yellow at the start of the break, but have kept the break under control. You got a good rush on black after scoring 1-back, allowing you to pick up blue in Corner I. It should be easy to get the four-ball break into shape, but you have the tricky problem of a very dead partner ball.
| CASE 4 |
|
The key to the sequence is positioning (or peeling) yellow at #2. You've already missed the chance for a straight peel when red was for #2 or a back peel when red was for 1-back, so you'll have to come up with something more unusual. If you haven't made up your own plan yet, STOP READING NOW and think of one before continuing.
The closest red's break comes to #2 is at penult. If you use yellow as the penult pioneer, then you have a good chance of rushing yellow near #2 after scoring penult. If you have placed an escape ball at #2 prior to scoring penult, then you will hope to position yellow with a short croquet stroke, then roquet the escape ball and continue to rover.
If yellow is to be the penult pioneer, then clearly black will have to be the 4-back pioneer. You should split yellow so that you can rush it toward Corner I after scoring 2-back, which will allow you to split yellow to the middle of the court while getting a rush on black toward 3-back (to make the stroke loading 4-back and going to 3-back much easier). After scoring 3-back, blue is rushed or sent to the middle as a pivot, then yellow is rushed upcourt and split to penult while red goes to black at 4-back. Black becomes the rover pioneer, and blue is sent to #2 as red goes to penult. [It would be just as easy to make blue the rover pioneer - you could put it there after 3-back - but black is preferable in case you have to fix yellow after scoring rover; see below.]
Split yellow a short distance southwest of the wicket, then run the wicket with control, trying for a rush back to #2. If the rush goes well, you should have an easy split shot to position yellow. [If the rush goes really well you can try to peel yellow. Don't attempt the peel unless the position is very easy, because if yellow bounces off to the side you've got problems.] Then rush blue either to the northeast of #2 and take off to rover, or rush blue to rover (my preference). In either case, score rover, rush or croquet black south, and (if necessary) position blue at #2 or #3, clearing red in the process if you get an easy chance to do so. If blue is at #2, then red goes to #3, and vice versa.
In the event you fail to position yellow after penult, you have a difficult choice to make before roqueting blue and proceeding to rover. The best way to be certain of fixing yellow's position will be to double-load rover with blue and black. After you score rover, send black toward Corner I or Corner IV, then rush blue back to #2. You will then have one more rush and croquet stroke on yellow to get it into position. Unfortunately, you will then be last-dead on partner.
To avoid that, you can leave blue at #2 and take off to rover, but then after scoring rover and rushing black south you have a long take-off back to yellow - which you want to roquet first - and if the take-off is less than perfect you may make matters worse. However, if the take-off is too long or too short, you will probably be able to roquet blue first, then take off to get a close rush on yellow. Of course now you're last dead on partner again, but perhaps this is the best choice. If the take-off from black goes well then you will be last-dead on blue, and may even be able to clear red's deadness.
[From the starting position, another plan is to send yellow directly to #2 after scoring 2-back. Then after 3-back blue is rushed to penult or to near #2, and yellow is positioned on a short rush. You may even be able to peel yellow with a thick take-off while red goes to black at 4-back. An elegant sequence, but one which depends on many accurate strokes in a row. If you fail to get an upcourt rush on blue after 3-back - a not unlikely occurrence - you will have an ungainly roll stroke to load penult, and will probably have to position yellow after penult, then take off to rover. The long, thin take-off has many pitfalls. Often the striker's ball comes up well short. You may send yellow out of position. Or you may commit a fault, failing to move yellow. Beware the plan which requires a string of highly accurate strokes.]
CASE 5: Go Ahead, Make My Day - The Killer Leave
Partner (blue) is for penult, with no deadness. Black is running a four-ball break.
You could make the standard rover leave, with yellow near the south end of the court, red hidden at penult, and blue and black near the north boundary. However, in this case you have such an easy play to finish the game that your opponent is almost certain to shoot into the leave, no matter how good you make it. Since yellow is going to shoot anyway, you should put blue and black right on the nine-inch-line, taking last-deadness on partner to do so.
In a sense you are putting all your eggs into one basket: that yellow will fail to roquet, and that you will finish the game on the next turn. This is the "Killer Leave".
| CASE 5 - THE KILLER LEAVE |
|

Note that this sequence is identical to the standard rover leave, except that red is placed more carefully after penult, and that blue and black are rolled out-of-bounds at the end. If you fail to get the wiring right after running rover and placing yellow, you are perfectly set up to revert to the standard rover leave.
If yellow is for #5 or rover, send it toward Corner I or Corner IV; otherwise yellow will try to run the wicket hard, hoping to get to red - Although if yellow were for rover, I would certainly try to peel it through and peg it out.
If yellow is alive only on red, then this leave simply won't work. Try the variation on the standard rover leave you used in Case 2A, putting blue and red together near the north boundary, and leaving black at penult.
If blue is dead on yellow, then be sure to leave blue and black very close together (i.e., almost touching) on the boundary, otherwise yellow can try to shoot between them. In this case the upcourt rush on blue at the end of the turn is especially important.
Figure out for yourself how to make the Killer Leave when partner is for 4-back and when partner is for rover. (Sometimes, even on a four-ball break, the rover peel just doesn't work out, and you have to make a leave. Make it a good one. 26-23 is a galling way to lose.)
Partner (red) is for Rover, three-ball dead. Yellow is running a three-ball break with red and blue. Black is in Corner I.
There is a variation on the Killer Leave which you can use when the spent ball is on the nine-inch-line and your partner ball is for rover. Of course you are going to play for the rover peel, but if you fail to get red into perfect peeling position you should make this leave instead of trying an angled peel, a back-peel followed by a cannon peg-out, or any other such nonsense. This leave is often the best play, even when red is alive on all balls.
| CASE 6 |
|
Obviously this leave isn't suitable if blue is dead on black and alive on red.
[If blue is your penult pioneer and you fail to get a rush to rover after scoring penult, you can leave blue in its final position now and take off to rover. Just be sure that blue has an open shot on black. You might do it this way if you thought the take-off gave you a better chance of peeling red. I usually wouldn't, because even if the peel is successful sometimes you will fail to get a rush to the peg. This is not a problem if you have double-loaded the wicket so that you can roquet blue first, then get a rush on red.]
In this variation of Case 6, yellow is running a four-ball break.
As I said earlier, sometimes the rover peel just doesn't work out. In this case, red is three-ball dead, so the normal Killer Leave (Case 5) won't work. How can you make it so that red is in position at rover, black is on the boundary, yellow is pegged out, and blue has a shot only on black? You could simply roll yellow and black out of bounds (separated, of course), but then you have no way of finishing the game, and you give your opponent the initiative.
The trick is to play a croquet stroke which both sends black out of bounds and pegs out yellow. This is a somewhat nervy stroke, but is reliable enough if you get black to within about a yard of the peg.
Usually in this situation you will be concentrating (rightly) on getting the rover peel done. But if the peel looks uncertain, such as when you've just scored 4-back and sent red two yards wide of rover, you should prepare for making the leave in case you don't get good position for the peel. Double-load penult. After scoring the wicket, roquet black and send it to the peg while getting a rush on blue to rover. Rush blue down and leave it a yard or so northeast or northwest of the wicket.
If you do manage to peel red, you are now well positioned for the peg-out. But if you fail to rush red into good position for the peel, split it to the side of the wicket, then rush it back into position after you run the wicket. Do not peel it now! Position red carefully and then rush blue a few yards up the court. Croquet blue toward the north end of the court where it will be wired from red. Rush black as close as possible to the peg. If you get black to within a foot of the peg, you are close enough to play a split-drive stroke, and you have a wide range of options for where to send black off the court. If black is between one and two feet from the peg, you can still try the split-drive, but it is somewhat risky. Beyond two feet, and up to about two yards, you can still safely send black off and peg yellow out by playing a hard maximum-angle split-shot - essentially an "ultra-fat" take-off.
[The striker's ball will pull quite a lot on this stroke, so you need to practice it to learn how to line up the balls correctly. You also need to practice to get a feel for the 45 degree aim point, and for how hard you need to hit to be sure of sending black out of bounds. Incidentally, this stroke is also the key to the "open cannon" or "pseudo-cannon", which allows you to get two boundary balls well into the court, sometimes even creating an instant three-ball break. So it really is a stroke worth knowing how to play.]
With the max-angle split, you will have only two choices for which direction to send black. If, unusually, neither direction will send black off at a spot open to blue, then you may be able to send black off the south end of the court with a stop shot, putting yellow two or three yards north of rover. If you are lucky, blue will be open only on black, and red will be able to rush red to the peg after scoring rover.
Partner (black) is for #3, with no deadness. Yellow is in Corner I. You are running a three-ball break, and have just roqueted black at 3-back (blue's wicket). You have had some trouble just keeping the break together, and have missed all of the usual opportunities for picking up yellow.
| CASE 7 |
|
A more realistic scenario is that you do not get such a good rush after penult, or any useful rush at all. There are several sequences which will get yellow to #3, blue and black toward the east boundary, and red toward the west boundary. First off you have the choice of double-loading rover, or of sending black directly to its final location after penult. In either case you rush red toward Corner I after scoring rover, then pick up yellow.
Some of these sequences may seem difficult at first, but keep trying - you may find that they are easier than they first appear. Once you have done the leaves several times the sequences become almost automatic, allowing you to concentrate on execution. And remember that there is an almost limitless variety of possible configurations beyond
AUTHOR'S PROFILE: Jeff Soo is a freelance recording technician and musician who lives in Chapel Hill, North Carolina, and plays at the Stoneridge Croquet Club. He has an understanding spouse and in recent years has achieved considerable prominence on the road as a highly ranked player in both American and International rules. He won the USCA National Doubles Championship in 1999 with partner Paul Scott. As a member of the six-person MacRobertson Shield team for the international test matches in Christchurch in January/February, 2000, Soo participated in the breakthrough performance that moved the U.S. ahead of Australia into third place among the major croquet powers. He is an experienced tournament director and one of the featured pros in the inaugural season of the new National Croquet Center in West Palm Beach, where he will conduct clinics in both International and American rules play during the Launch Week Croquet Festival in late January, 2001.